OOOH, MY GOODNESS! I cannot...repeat...CANNOT believe that my Colson will be TWENTY YEARS OLD on Monday!!! I am determined not to get all "mushy," about it, here, but...sniff...
Here are the details of how I made his MANLY card:
I wanted to use tools from my supplies that I'd not, yet, used -- not a tough call, since MOST of my tools haven't been put to work.
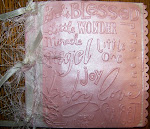
I cut three pages from a wallpaper book that I'd been given. One page looks like leather, so I used it with my PTI "Tabbed MiniBook Page" die to create covers for an attached-to-card booklet. Inside, "dusty peach" pages were embossed with a Sizzix "notebook" folder and trimmed to fit. For fun, I jotted down notes on the pages that give a few details of Colson's life and "likes." The booklet covers and pages were distressed with ink and with a distresser tool to rough 'em up a little.
The front of the booklet was decorated with both wallpaper and card stock die-cuts made with PTI "Mat Stack 1," "Mat Stack 2," and "Numbers" dies. Twine was wrapped around the front cover to provide a bit of fiber to the card.
A strip of wallpaper was adhered to the bottom of the card front and a card stock banner was stamped, hand-cut, and adhered atop it.
Distressed card stock and a layered wallpaper strip were adhered to the inside of the card for Colson's dad and my messages.
Next, will be to bake him my OH, SO SPECIAL yellow cake with chocolate-mocha frosting!! (Colson likes my cake EVEN MORE than my handmade cards!)
Saturday, June 18, 2011
Sunday, June 12, 2011
TWEAKING A PREMADE CARD
My weekend has been more hectic than usual, so I didn't have hours and hours to devote to making a birthday card for my son, Taylor. Hmmmm...what to do?
I remembered purchasing a boxed set of cards, yesterday, that were printed with various designs, so I checked 'em out and discovered that one of the designs was masculine and multi-colored. I could surely add some elements to it and make it a special card for my son!
When I turned the card over, I saw that the manufacturer's information was printed along the bottom edge. Ugh! That would NOT remain! Tweaking would begin there!
I cut about 1/2" inch from the bottom of the card back, then roughed up the cut edge. Close To Cocoa S.U.! ink was smudged over all the edges. I chose a 7 Gypsies border punch and ran it along a strip of cream cardstock that I had sponged with S.U.! Kiwi Kiss green ink. Runner adhesive was applied to the underside edge of the shortened card panel and the punched strip was glued in place. Now, the backside of the card had been "converted" to the card FRONT!
When I don't feel terribly inspired to create, I use my cardmaking time to cut shapes from colored card stock with misc. dies and punches and store the die-cuts for later use. Well, TODAY WAS A LATER DAY!
While scavenging my die-cuts stash, I found a Pink Persimmon banner that I had stamped with "Happy Birthday" and I trimmed it out with scissors for the top of Taylor's card. I selected a gray PTI "ad" die-cut and edged it with PTI Vintage Cream ink, then rummaged through a container of odds 'n ends until I unearthed a silver, metal item that I'd purchased looong ago on clearance at Hobby Lobby. (I think it is meant to slip over buttons to create a collar of sorts.) I laced some twine through a chipboard button, adhered it to the center of the metal piece -- and glued that atop the gray shape to complete the card.
I am happy with my "tweaking" efforts and think that Taylor will be pleased with his birthday card!
Monday, June 6, 2011
PAPER BAG "thank you" Mailer
Today, I received in the mail a signed copy of an online friend's FIRST published children's book. It was a sweet and thoughtful gift, given because I did some copy editing on her SECOND soon-to-be-published book. I was happy to help and surely didn't expect anything for it, but I'm just TICKLED to have a copy of her first work!
And, is it EVER cute??!!! This first book is entitled, Sh Sh Sh Let the Baby Sleep by Kathy Stemke and illustrated by Jack Foster (ADORABLY!).
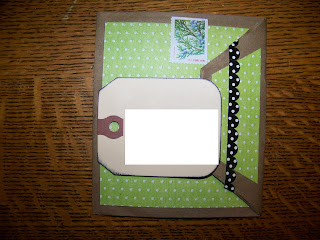
I thought it appropriate to send a creatively constructed "thank you" note, so I made a paper bag mailer.
I am hoping that it safely clears the postal machines and survives being handled, sorted, and bundled. Velcro dots hide beneath the decorated bag flap, providing a means to repeatedly open and close the mailer. The addressed (edited from photo to ensure her privacy) shipping tag is secured with thick, super-sticky circle ZOTS on one end and temporary-glue dots on the "flap end."
Inside is a white card stock panel, edged in black, for my note of thanks.
Gulp...we'll see if it makes the trip.
Labels:
paper bag,
rubber stamping,
thank you note
Sunday, June 5, 2011
MASCULINE BIRTHDAY CARD
This is the card I made for my son, Colson, for his 19th birthday. Since his childhood passed entirely TOO quickly for my liking, I thought that "clocks" would make a good background.
The base is kraft cs, with Tim Holtz paper layered atop -- and a strip of green paper at the bottom of the card as an anchor for the sentiment. A shipping tag was sponged and Sizzix alpha die-cuts were used to spell-out his name. A bit of rough twine added a subtle touch.
This month, Colson turns TWENTY -- passing from his teens to manhood!!! (sniff)
Friday, June 3, 2011
WHIMSICAL BIRTHDAY CARD FOR MY SIL
My son-in-law, Chad, owns some Fed Ex routes and trucks, so I thought it might be FUN to incorporate a Fed Ex theme in last year's birthday card. Since I am just NOW getting into this "blogging thing," this is a VERY late post, but the photos haven't aged, AT ALL. Ha!
The card was made to resemble a file folder, with just a small strip of the folder used on the card front as a base on which to adhere "legal pad" paper layered over red card stock. I scribble-sketched a calendar and circled his birth date, drew a portion of a "fragile" box, and stamped a checklist of TO DO errands and chores. The "Make a run" text and truck were created with my PrintMaster software.
I composed a little ditty for the inside of the card and added confetti graphics from PC Crafters. The card back was given a lil whimsical touch, too.
The card was over-sized, so I made an envelope, which ALSO received a touch of my humor.
It was a BLAST to make Chad's card & envie -- and he liked the results! Now, what to make THIS year?!!
Subscribe to:
Comments (Atom)


